
FAQ
Got some questions? Read through these frequently asked questions with answers for the quickest solutions.
1. Why does the laser module have no laser injection, and the laser module has laser injection, there is no trace of engraving, and the material cannot be cut?
First, confirm whether the laser cable is plugged in properly, and then re-insert the laser and motherboard plugs. Or refer to the material parameter setting table (link), appropriately increase the number of engravings, or appropriately slow down the cutting speed. Secondly, judge whether the laser is faulty by operating the output power of the laser. The steps are as follows:
Step 1: If it is confirmed that the laser does not emit laser light;
Step 2: Remove the control box;
Step 3: Change the position of the laser connection socket;
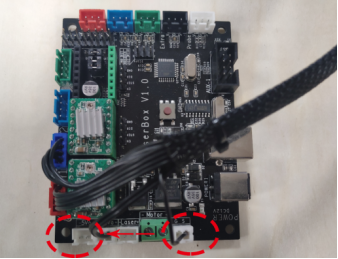
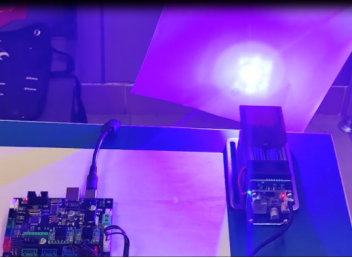
Step 4: Test whether the laser of the laser can effectively ignite wood and paper, otherwise it proves that the laser is faulty.
2. Why doesn't the laser module fan work and make abnormal noises?
First, reinsert the laser cable and reinsert the fan cable. Next, check whether there is foreign matter in the fan and whether it touches the connecting wire. Finally, if the laser can move and engrave typically, but the fan still does not rotate or makes abnormal noise, it means that the fan is broken and needs to be replaced.
3. When the machine is running, the X-axis does not move, the Y-axis moves, or the X-axis moves and the Y-axis does not move.
The faults of the two drive blocks on the main board of the control box can be judged by swapping the connecting wires on the X/Y axis motor, open the software, and click the "up and down" "left and right" arrow buttons on the software to observe the X/Y axis Whether it can be moved (Note: if the X-axis does not move, the X-axis drive block on the motherboard is damaged, and if the Y-axis does not move, the Y-axis drive block on the motherboard is damaged) This fault needs to be solved by replacing the motherboard. The detection steps are as follows:
Step 1: Swap the two connecting wire plugs on the motor;
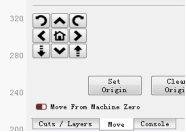
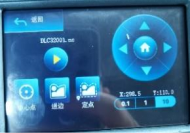
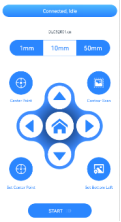
Step 2: Click the arrow on the LaserGRBL software to move the X/Y axis; click the arrow on the LightBurn software to move the X/Y axis; click the arrow on the ATEZR offline display to move the X/Y axis; click the arrow on the App software to move the X/Y axis Move the X/Y axis.
 |
 |
 |
 |
| LaserGRBL adjustment interface |
LightBurn adjustment interface |
Display adjustment interface |
App adjustment interface |
4. Why can't the machine turn on?
First, confirm whether the indicator light on the adapter is on. If it is not on, it may be the adapter failure. Next, check whether the adapter output is 24V/12V voltage output, if there is no output, the adapter is faulty. Finally, confirm that there is no abnormality in the output of the adapter, but it still cannot be turned on, and the motherboard needs to be replaced.
5. The device cannot read the TF card, and the TF card cannot copy the content.
First, you can format the TF card, and then re-import the file (Note: TF card cannot create folders, only GC and NC file formats). Or confirm whether the TF card is inserted reversely and check whether the motherboard TF card slot is damaged. Finally, the TF card can be replaced.
6. Why is the USB connection unsuccessful?
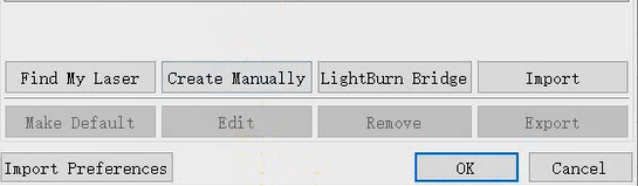
First of all, you can replace the USB port of the computer. If the serial port cannot be recognized automatically, the LaserGRBL software can be used directly online. If the LightBurn software cannot automatically recognize the serial port, you can manually add the USB serial port. The steps are as follows:
Step 1: Select "Create Manually" -> "OK"
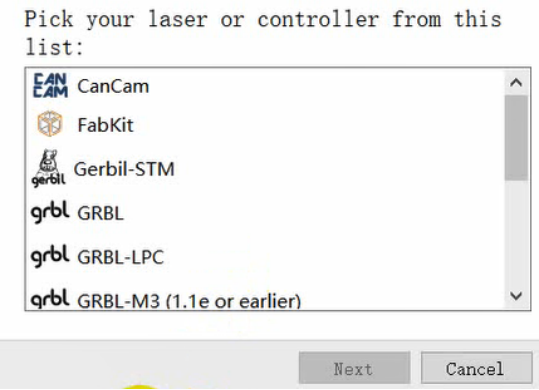
Step 2: Select "GRBL"
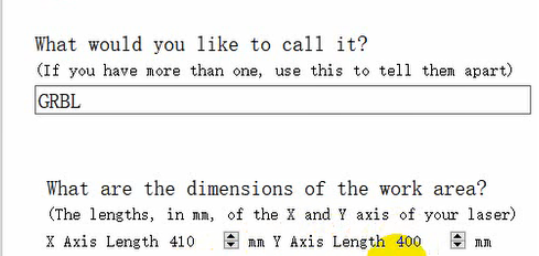
Step 3: Enter 410*400->Turn off "Auto "home" your laser on startup?"

Step 4: Select "GRBL" -> "OK"
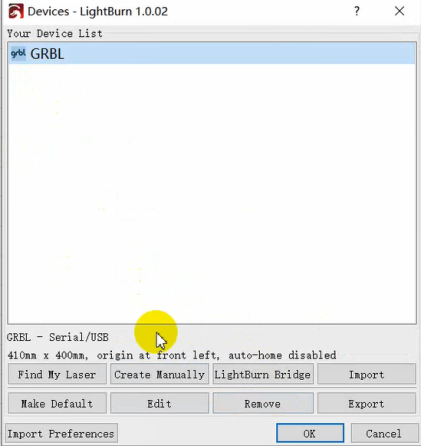
Note: The LightBurn operating software cannot automatically identify the serial port, you can directly create and add a serial port manually.
7. How does the machine work offline?
After importing the TF card into the file, you can directly use the operation screen to operate.
8. Will the laser hurt my eyes without glasses?
First of all, the laser head is equipped with a protective cover, and direct viewing will not hurt the eyes. Secondly, the laser has passed the IEC-80625 safety certification.
9. The engraving line is not a straight line, the machine movement is not smooth and the machine movement has abnormal noise.
This problem is caused by the failure of the optical shaft, timing belt, POM wheel, eccentric nut, and damaged accessories. The workaround is as follows:
Step 1: optical axis adjustment: correct the optical axis or replace the optical axis accessories.
Step 2: To adjust the tension of the timing belt:
If the synchronous belt is too tight, it will cause abnormal noise. If the synchronous belt is too loose or too tight, it will affect the engraving/cutting effect. Use an Allen wrench to loosen the T-shaped nut, tighten the synchronous belt, and then tighten the T-shaped screw. The same as the tightness of the belt, the roller can move smoothly).
Step 3: X-axis, Y-axis timing belt tightness adjustment.
Step 4: POM wheel adjustment:
If the POM wheel is scratched or the roller is deformed, it will cause the movement to be unsmooth, and the roller can be replaced to solve the problem of uneven movement.
Step 5: Adjustment of eccentric nut: The eccentric nut is used to adjust the tightness of the POM. If the eccentric nut is too tight, the POM wheel will be too tight, which will cause the machine to move abnormally or not move smoothly. If the eccentric nut is too loose, the POM wheel will also be loose. When engraving, it will cause the effect of engraving/cutting and the movement is not smooth. This situation can be solved by adjusting the eccentric nut with an open-end wrench.
 |
 |
| Y-axis POM wheel adjustment | X-axis POM wheel adjustment |
10. Graphic misalignment when engraving/cutting.
It belongs to the firmware configuration command error. It is necessary to update the firmware to solve this problem. To obtain the installation package and firmware file, customer service email: [email protected].
11. How to solve the frame drop phenomenon during the engraving process?
Reason 1: It may be the jumping step caused by the scratch of the POM wheel, by replacing the POM wheel accessories.
Reason 2: It may be that the synchronous wheel of the motor is loose, resulting in lost steps, which can be solved by tightening the synchronous wheel.
12. When the laser head is reset, it collides with the machine frame, will it affect the service life of the laser head?
No, you can move the laser up and fix the laser without hitting the laser. Move the laser to the middle of the machine for engraving, which can avoid hitting the laser.
13. Laser head eye protection glass has burnt residue of the compound glue due to repeated use. Does it need to be cleaned in time, and whether any cleaning agent can be used during cleaning, will it affect the eye protection effect of the eye protection glass?
The laser eye protection glass is prone to dust residue during use, and there will be no composite glue residue. It is recommended to use alcohol to clean up the dust in time, and the eye protection effect will not be affected after cleaning.
14. Does the engraving machine come with an SD card? What is the capacity of the SD card?
Yes, SD card capacity is 4G
If you need other consultations and video operation steps, you can send an email to [email protected] to obtain or log in to our website http://atezr.com to inquire about the relevant documents.